


On-Page SEO
Google Search Console: A Comprehensive Guide
6 mins | 20 Feb 2023
Are you a business owner facing a recent dip in leads? Are you sure you are targeting the right audience? All the answers to your questions lie in one tool. Any guesses? Don’t scratch your heads. The magic tool is Google Search Console.
Google Search Console is every SEO pro's best friend. For any issue or challenge on a website, Google Search Console is a reliable friend who always guides them and gives them answers.
The term might have been like a bouncer for people unfamiliar with SEO. No worries. The 12Grids is always at your disposal.
In this article, we will have a detailed look at Google Search Console. So are you ready for the run??
What is Google Search Console?
Google Search Console is a free web service hosted by Google that allows publishers and marketing professionals to monitor their overall site health and performance relative to Google Search.
It offers an overview of metrics related to search performance and user experience to help publishers improve their sites and generate more traffic.
Majorly used by SEO professionals, it provides a way for Google to communicate when it discovers security issues (like hacking vulnerabilities) and if the search quality team has imposed a manual action penalty.
How important is Google Search Console in SEO?
As I mentioned, Google Search Console is vital for any SEO professional. Google Search Console's applications are many, from checking the website traffic to analyzing the website's technical issues.
Here’s a list of benefits of Google Search Console:
→ To keep track of the website traffic:
Besides Google Analytics, Google Search Console is also used to analyze website traffic. The tool shows metrics about organic traffic coming to a business’s websites and each URL. It also provides details such as clicks, impressions, click-through-rate, and average keyword rankings.
→ To check the website's health:
Search Console is also designed to ensure your site’s presence in Google is unharmed and that you don’t have errors that could damage your rankings.
Here Google offers a few reports that can help websites ensure they are not penalized for violating Google rules, are error-free, are properly mobile-friendly, are not too slow, and more.
→ To get a Sitemap report:
The Sitemap section of the Search Console is used for submitting a site’s list of total pages so that Googlebot can more easily and more quickly crawl them. This is a step that is encouraged by Google!
You can use the Sitemaps report to tell Google about new sitemaps for your domain, see how frequently they get crawled, and see any errors that Google encountered when parsing your submitted sitemaps.
It also provides information on how many new URLs are discovered by Google directly from your sitemap.
→ To check any URL:
Google Search Console helps with URL inspection too. The tool lets users ensure that their page is in the Google index (or see if it’s not); they can also request indexing here. Plus, they can view a rendered version of the pages, test it to ensure that Googlebot can read the pages, view loaded resources, and see if the page is canonicalized by Google or instead canonicalized to another page.
→ To remove a link:
Another significant advantage of Google Search Console is to remove links from the website. The removal tool won’t stop Google from crawling your pages; it will only prevent them from appearing in searches (for approximately six months).
→ Core Web Vitals Report:
Google Search Console helps generate a core web vitals report. The report measures LCP, FID, and CLS for pages across the domain property. These metrics are designed to give web owners and marketers information on their site's performance in crucial user experience areas. The report also lets businesses review metrics about the loading speed of pages on their site.
SEO Trends In 2023
How to set up Google Search Console for your website?
Setting up a Google Search Console account for your website is very simple. Let’s have a look at the steps:
Step 1:
Sign in to Search Console With Your Google account.
Note: You’ll need a Google account for this method to work when setting up Search Console. Don’t worry, that’s free, too. You can use the same login if you already have Google Analytics, Adwords, or Gmail.
Step 2:
Enter Your Website’s Domain (or URL-Prefix) to Add a Property.
After you sign in, you can add a property type via your domain or a URL prefix.
You can set up your property via the “Domain” option. It lets you set up your account as a domain-level property. It also means you’re creating a single property that includes all subdomains and protocol prefixes associated with your domain. In other words, this option connects Google Search Console to every aspect of your site.
Step 3:
Verify Your Website
To implement Google Search Console and gather data, you must verify that you own your site. The verification process varies depending on your chosen option in the previous step.
There are two ways to verify the website:
- Verification for a Domain Property
- Verification for a URL-prefix Property
Verification for a Domain Property:
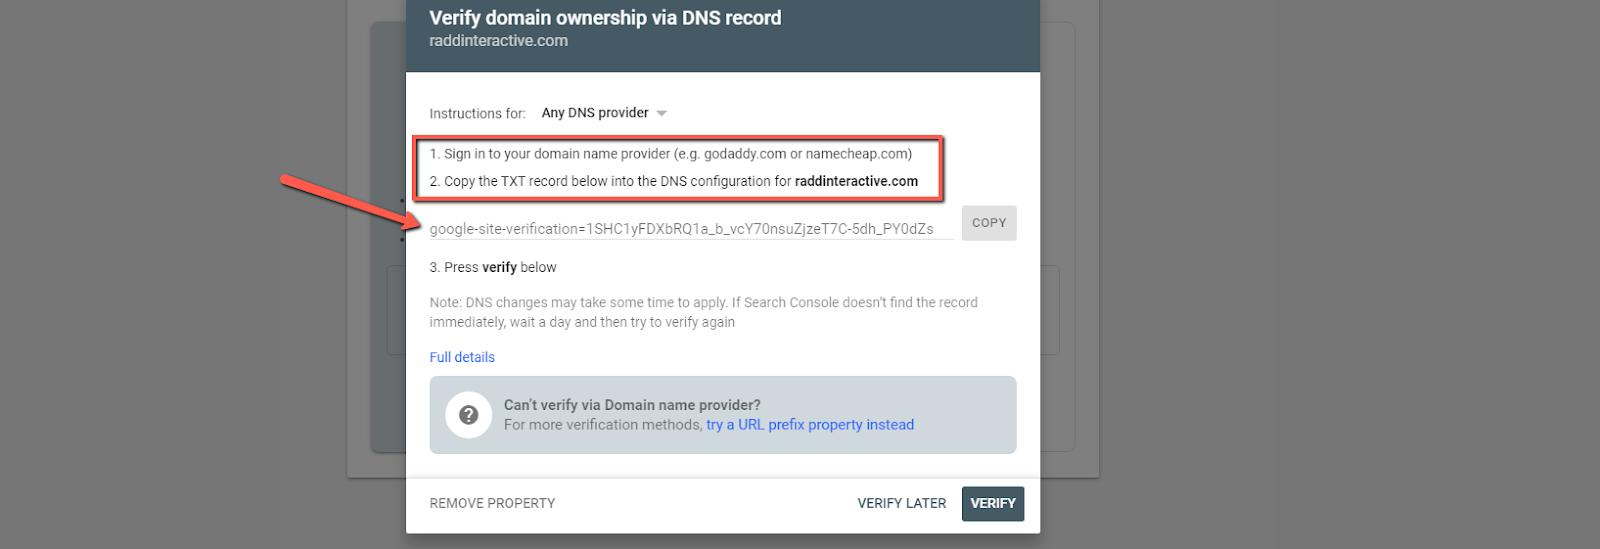
Verifying for a domain property can be done through the DNS provider. To verify for a domain property, you will get the following screen:
Next, see if you can find your DNS provider (the company you pay to use your domain) in the dropdown:
This will display detailed instructions specific to your provider. If you want to know how to implement Google Search Console for your digital marketing strategy using this method, you might want to work with either your developer or DNS provider. If you don’t see your provider, you can leave it as “Any DNS service provider.”
Next, hit the “Copy” button to copy the TXT record provided to you by Google.
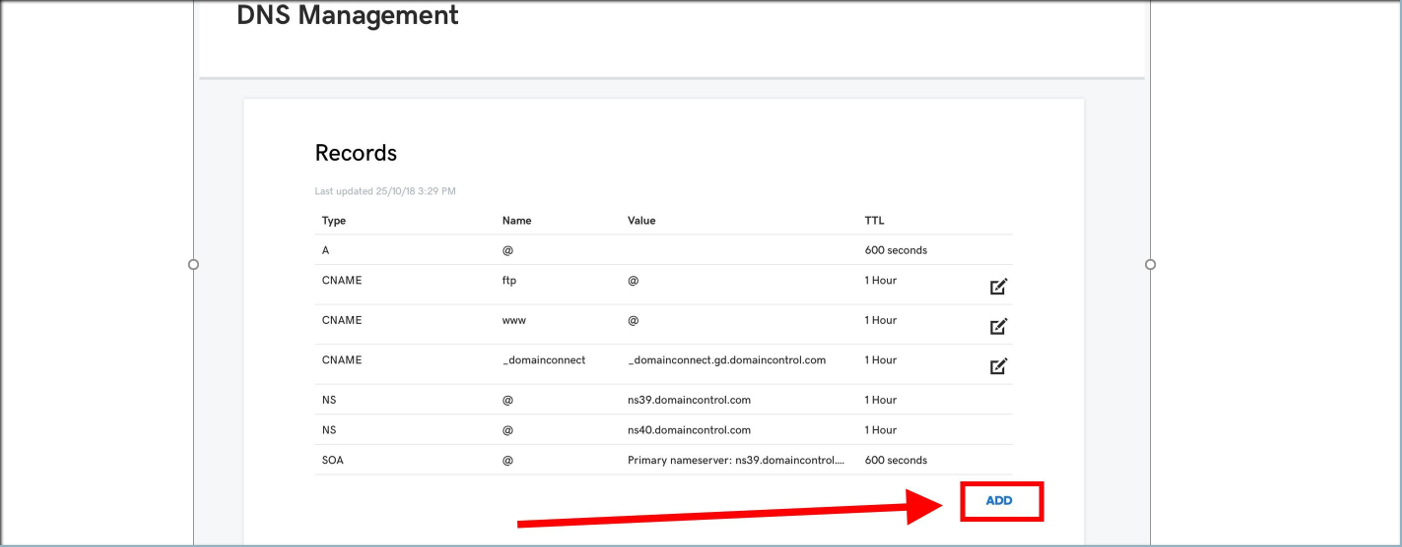
Once you’ve copied the TXT record, open your domain registrar’s site in a new tab (for example, GoDaddy, Bluehost, Hostgator, etc.) and log into your account with them.
Navigate to the list of domains you own and select the one you wish to configure. Find the option to manage your DNS records. Depending on your provider's site, this will be located in different places. Look for any mention of “DNS” and click it.
If you use GoDaddy, then go to “My Account > My Products” and select “DNS” next to your domain.
You’ll then be brought to a Domain Management screen where you’ll find a list of your DNS Records. Select “Add” to create a new one.
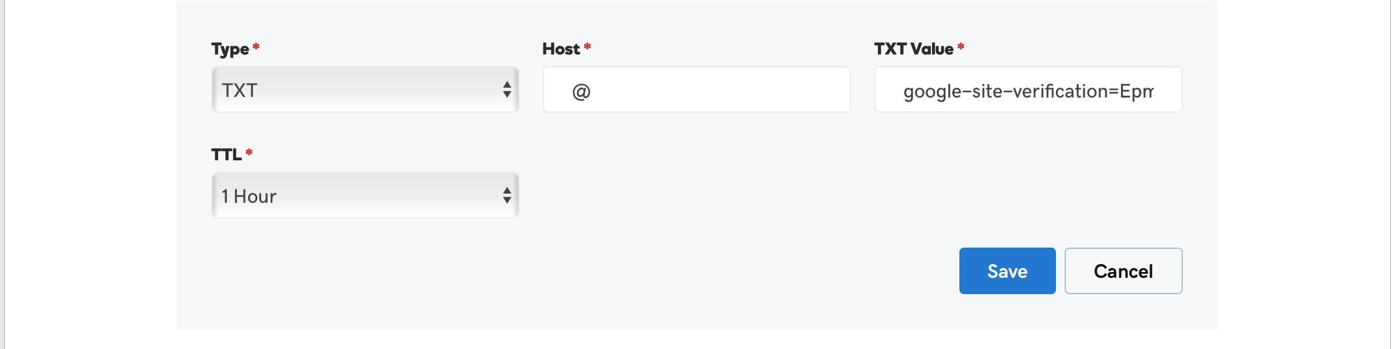
Select “Type” and choose TXT. Under “Host,” type in the @ symbol. Leave “TTL” at 1 hour. And most importantly, paste the TXT record you got from Google into the field for “TXT Value.” Then hit “Save.”
Return to the Google Search Console setup with your TXT record added and select “Verify.”
Voila!! Your website is verified.
The Ultimate Guide to Google My Business
Verification for a URL-prefix Property:
You can set up Google Search Console using a URL-prefix property if you don’t have access to your registrar or would rather not mess with your DNS records. This provides a number of alternative options for verification.
Google recommends verifying via an HTML file. (But remember, this is just for URL-prefix properties. Ultimately, they recommend you create a Domain property, if possible.)
Notice there’s an option to verify via domain name provider. We showed how to do that above. But if you’re considering using that method, you might as well create a domain-level property.
Verify by HTML:
For this method, you need to upload an HTML file to the root folder of your website. It’s easy to do, but the downside is you will need access to your server via FTP or a cPanel File Manager. If you’re unfamiliar with either, don’t attempt to verify via this method.
Here are the steps to verify using an HTML file:
- Download the file provided by Google. (By clicking the download box shown in the image above.)
- Access the root directory (aka public_html) of your site.
- Upload the file. (Like the image example of how the file will appear shown below)
- Return to Search Console, and select “Verify.”
Verify by HTML tag:
You need to add a meta tag to your site’s section to verify using the HTML tag. To do so, you’ll need developer access to your site’s CMS. We’ll use WordPress as an example.
Using WordPress, there are two ways you can do this:
- Adding the meta tag directly to your header.php file
- Using a plugin to add to the header
Want to use a plugin to add a GSC HTML tag to WordPress? Check out the steps given below:
- Copy the tag.
- Log into your site’s WordPress admin in a new tab.
- Install the Insert Headers and Footers plugin on your site.
- Go to Settings>Insert Headers and Footers.
- Past the Search Console meta tag in the “Scripts in Header” field.
- Return to Search Console, and select “Verify.”
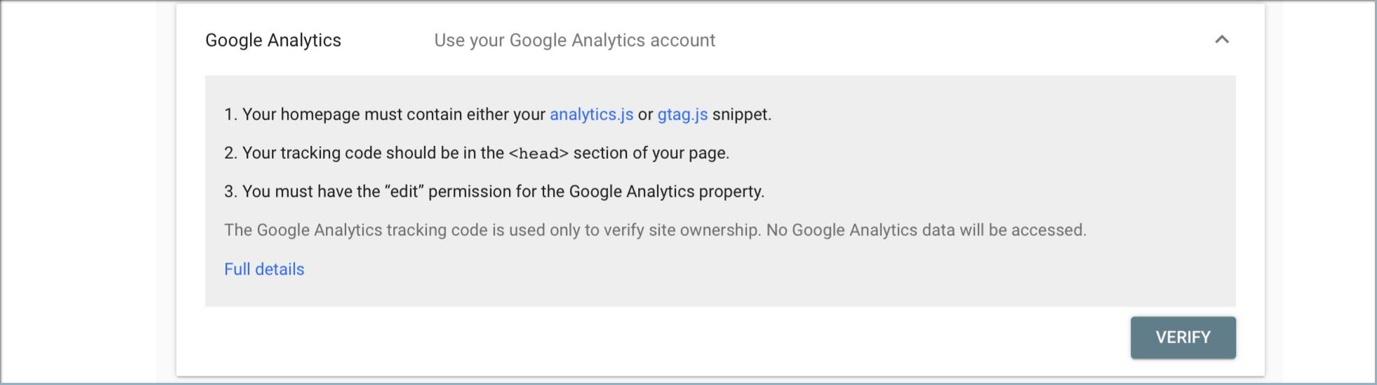
Verify by Google Analytics:
If you have a Google Analytics account and have installed a tracking code on your site, you can follow the steps for getting started with Google Search Console by verifying a User-prefix property through there. Just open the Google Analytics verification box in Search Console and click “Verify.”
Verify by Google Tag Manager:
Verification by Google Tag Manager is straightforward. Like Google Analytics, you can verify using a single click in Google Tag Manager.
Follow the same steps you have done while verifying by Google Analytics.
P.S. For this to work, you need to have the Tag Manager snippet installed on your site AND have permissions for Tag Manager set to “Publish.”
How to use Google Search Console to improve SEO?
Typically, Google Search Console is used by SEO professionals for analyzing the health of the website and getting the website traffic. Let’s have a look at the other ways you can use Google Search Console to improve the SEO of your website.
At a high level, here’s how to use Google Search Console for SEO:
- Track keyword rankings, impressions, organic traffic, average position, and click-through rate (CTR).
- Understand index coverage and confirm that Google crawlers are properly indexing web pages.
- Submit sitemaps, disavow files and removals.
- Identify and troubleshoot page experience, Core Web Vitals, or mobile usability issues.
- Confirm Google sees schema.org markup so web pages can appear in rich results.
- See security issues or manual actions Google has identified.
- Analyze essential backlink data like total external links, internal links, top linked pages, top linking sites, and anchor text distribution.
What are the reports and features of Google Search Console?
Google Search Console is the holy bible for all SEO professionals. It offers many features that help improve the SEO of any website. Here are the top 5 features of Google Search Console.
→ Search Analytics Report:
Search Console’s Search Analytics reports provide a comprehensive range of critical insights into your website’s search performance on Google. Once you have Search Analytics loaded up, you will be presented with an array of options for viewing your search traffic data. You will see checkboxes for Clicks, Impressions, CTR, and Position at the top of the Search Analytics graph.
→ Data Highlighter:
The data highlighter is a fantastically usable and intuitive tool that enables you to add structured data (data that tells Google what your content is and how it should be treated) to your site. You may already have structured data within your site, which would have been sorted out by your brilliant web developers, in which case this tool won’t be of so much use. You can check by visiting the Structured Data menu item for a full report on how much of it is on your site.
The data highlighter is an excellent tool that tells Google what that page might be.
→ HTML Improvements Tool:
The HTML improvements tool points handily out the issues with your site and provides suggestions on how to fix them. This tool finds a list of HTML issues on your site. These will include title problems, meta description problems, and non-indexable content problems (and it would be perfectly normal for your site to have all three).
→ Remove URLs From Google Search Results:
The Remove URLs feature temporarily lets you hide specific URLs from Google’s search results. It can come in handy for hiding popular content that skews Google’s impression of your site in the wrong direction or removing content that is still listed high up for a particular search but which is no longer relevant.
To remove a URL, click on “Temporarily Hide” and then type in the ‘relative path’ of the image, page, or directory you wish to remove. You should use the same URL associated with the relevant content in Google search results.
Conclusion
As Google keeps updating its algorithm, the usage of Google Search Console is becoming more and more important for an SEO professional. The benefits are many, and there’s nothing to lose.
So, when are you planning to install Google Search Console for your website? Do you have any queries on Google Search Console? Drop them in the comments box and let the SEO experts from 12Grids help you find answers to your questions.
Author

Abhishek Sawant
Marketing Researcher